Refactoring

Update:

No new information on the ADC feature request on Espressif”s forums.

Side Project:

I have started layout of the SSD1332 Breakout PCB.  I finished the layout and ordered PCBs from OSHPark.  Based on the datasheet for the SSD1332, I can get significantly better performance by using it in one of the 8 bit bus modes.  Someone suggested that I look at STM32 processors to drive the display with.  I will be considering that option this week.

Better Firmware:

Continue reading

Layout check … continued

With the new check plots I made last week, I checked the layout net by net like I did back in Sept 5, 2015. I am still uncertain about the pinout of the ESP-12F modules. To test it, I removed the ESP-12E installed on the board I am currently using, and replaced it with a new ESP-12F.  I had to be careful that the jumper wires all got back to where they were before removing the module.

The new module programmed first try but didn’t boot correctly.  I had forgot to upload default values, the flash comes programmed for a different memory layout.  Once I installed the default settings, it booted up correctly.  I had removed the test for HSPI/SPI RAM, so I went back into the code and re-enabled the Hello World ram test.

I went into serialInit() and changed the line DISPLAY_MENU(); to DISPLAY_MENU_W_SPI(); Re-compiled and tested.  Unfortunately the result was not “Hello World”. When I cleaned up the code, I made the write to SPI RAM easier, but I need to initialize the hspi.  I started connecting my mixed signal oscope to analyze what was happening on the SPI bus.  And… I found a loose jumper wire.  The one that connects the chip select between the ESP-12F and the SPI RAM. Once this was connected, the extra stuff I had put into the software became unnecessary.  I deleted the extra code and it works just fine.  The firmware is back to where it was before I started testing. There are no changes to upload.

This means that the circuit is tested and the current layout is ready to send to fabrication.  I zipped up the gerber files. Then checked pricing with PCBway, DFRobot, and Seeed Studio.  With shipping PCBway came in a little less at US $19.  With PCBway, I have to wait for a design review before they will give me a final price and allow me to pay for it. Usually this is pretty quick but depends on the day it is submitted.

Have you bought boards from Chinese manufacturers? How quickly did you get them?

Code Documentation Firmware V00J

I Know that my code is very poorly documented.  So I want to focus on organizing and documenting the code.  To start with, I started looking for online classes that teach documenting code.

I found very little about commenting code.  I did find an interesting article I need to think about a bit more. The general theme of this article is to write code in such a way that comments should be rare.  For instance, code should probably be re-written if it needs comments to explain it. Variables should be named in a way that describes what they contain.

I was just about to give up searching. I was thinking I would start by putting header comments before each function or method.  This article gives pretty good reasoning not to do that. So this week, I decided to look at just one file — user_main.c.  Git does line by line version control.  I decided on one small header block at the beginning of the file.  This header block will indicate the license, original author, and/or the template source.

I looked to the header comments to know what to pass to and get back from a given function.  I have decided to make a new document that describes in better detail how to use each function.  This new file will be called UprogrammerFunctions.txt.  Since I removed the Comment block from in front of user_rf_cal_sector_set, That is the first function I am documenting in the API.

There is a big block of code in user_init() that all it does is set up the IOs to their initial states.  I copied that code into a new function called setup_io_pins() at the end of the user_main.c file. Next, I deleted all the test code I had commented out.  Finally, I made a couple of macros in user_config.h called VOLTAGE_BOOST_ENABLE()  and another one called VOLTAGE_BOOST_DISABLE()

Note: My definition of a macro is the use of a symbolic reference to represent other code.  In this place, I am using VOLTAGE_BOOST_ENABLE()  to represent  gpio16_output_set(0) to make it a little more clear what is going on. I also created a function in wifi.c to set up the wifi modem called wifi_init() and also put a prototype of wifi.init() in wifi.h.  I then moved the two wifi calls out of user_init() into the function wifi_init().

I tried to build and the call to the new function setup_io_pins() caused a linker error.  I needed to create a prototype of this function. I put it in user_config.h and it compiled, I uploaded it and it ran just like before I started cleaning up the code. I believe my user_main.c file is much more readable now.  I have uploaded the new version to GitHub. Click the firmware link in the right column of this page to go look at it or download it.

I would like to hear about your experiences cleaning up and commenting code.  What are your preferences for commenting code.

Sigma Delta still causes reboots Firmware Version 00E

I was hoping but not expecting the SDK Update to fix the Sigma Delta problem.  So first thing I did this week was to test.  Same failure as before.  I had two Ideas this week that might be an answer to the problem.  On another project, I was using the Arduino IDE to develop a little weather station project.  In it, I was using old code that set certain pins as output.  Those pins were/are tied to the SPI bus and was causing it to reboot.  Maybe, there is a pin set to have Sigma Delta(ΣΔ) output that is also tied to a critical pin.  My second thought is that if the ΣΔ is causing interrupts, I should disable them.

A good practice for microcontroller programming is to always set up all I/Os immediately after a reset.  I have gotten sloppy and haven’t done that with this project. If a pin is connected to the ΣΔ that shouldn’t be, this will fix that.
I started by writing down what each pin will do in the design. I referred to the schematic for each pin.

Pin 18 GPIO0 -- Output -- controls analog switch
Pin 22 GPIO1 -- Output -- TxD0
Pin 17 GPIO2 -- Output -- sets VPP output high
Pin 21 GPIO3 -- Input -- RxD0
Pin 19 GPIO4 -- Output -- ΣΔ pulse stream to generate Vpp
Pin 20 GPIO5 -- Output -- Sets Vpp output low
Pin 14 GPIO6 -- Output -- SCLK (SPI and HSPI overlap) (need to verify Pin number for ESP12F)
Pin 10 GPIO7 -- BiDir -- MISO (SPI and HSPI overlap) (need to verify Pin number for ESP12F)
Pin 13 GPIO8 -- BiDir -- MOSI (SPI and HSPI overlap) (need to verify Pin number for ESP12F)
Pin 11 GPIO9 -- BiDir -- QIO2 (SPI and HSPI overlap) (need to verify Pin number for ESP12F)
Pin 12 GPIO10 -- BiDir -- QIO3 (SPI and HSPI overlap) (need to verify Pin number for ESP12F)
Pin 9 GPIO11 -- Output -- CS0 (SPI) (need to verify Pin number for ESP12F)
GPIO12 -- BiDir  -- Data to target device
GPIO13 -- BiDir  -- Data to target device
GPIO14 -- BiDir  -- Data to target device
GPIO15 -- Output -- Chip Select for HSPI
GPIO16 -- Output -- Disables Vpp generation

I went into the user_init() function and removed all the commented out code leaving an example of the PIN_FUNC_SELECT() macro. I then set GPIO_PIN0 – 15 registers to 0 which disables interrupts and disconnects the ΣΔ output.  I compiled the code and uploaded it and it crashed.  To find the new problem I caused, I commented out all the new code except setting the GPIO registers to 0. I rebuilt and uploaded the code and … a continuous stream of reboots.  I commented out setting the GPIO registers to 0 then put the PIN_FUNC_SELECT() back in. And … reboots slowly.

I removed the function selects that should be controlled by the API anyhow(GPIO6-11). And … I found a typo on the GPIO6 function select. I fixed the typo, rebuilt, uploaded and it ran at least as well as last week.  I then started testing to see if it fixed the ΣΔ issue. The reset problem still exists.

Next I set a subset of the GPIO registers to a value of 0  I decided to go with the first 8 to see what would happen. Same failure, a stream of reboots. Then I noticed I wasn’t writing to the correct register locations.   I fixed this and then recompiled, uploaded, and code is running, but ΣΔ is still causing a reboot if i set the prescaler to greater than 99.

Next I started looking at the ΣΔ interrupt structure.  Unfortunately it has very little documentation that I have found so far.  I used google to search for articles pertaining to the use of the Sigma Delta and found very little.  My next step is to do a little experimentation. I decided to disable the ΣΔ while changing the prescaler.  I got the same results.  It’s time to make a Hello World program for a sanity check. It would be the minimum to set up and test functionality of the ΣΔ on GPIO4.  If it works correctly, then I have to take a deeper look at my code, if it doesn’t, I’ll have something to post to Espressif’s forum for help.

Have you had similar problems with a chip you have never used before?  I have uploaded the current code to GitHub. Use the link at the top of the right hand column to get the download.

Update to SDK 1.5.4 Firmware V00J

Since I don’t seem to be making any progress on the Sigma Delta output, I decided to update my copy of Espressif’s API. I went to bbs.espressif.com and clicked on the SDKs thread under the heading DOWNLOADS. In the list i looked for the most recent Non OS SDK release.  I saw that ESP8266_NONOS_SDK_V1.5.4_16_05_20 is the most recent release. It’s file name indicates a release date of May 20th 2016.  I downloaded the zip file and extracted the contents.

To Make moving forward a little easier, I renamed the SDK folder to UProgrammer.  This will help me maintain paths the next time I move to a new SDK Version.  Each time I update to a new SDK, I will Rename the OLD SDK folder to indicate it’s version number, and rename the new SDK folder to UProgrammer.  To maintain compatibility with Github’s folder naming, I will continue to keep the UProgrammer-Firmware folder name for the project files.  This folder will be sitting in the SDK folder I just renamed to UProgrammer.  I then created an empty text file with the name of the SDK file to mark the version I am working in.  Then I copied the hidden file .metadata from the old SDK folder into the new (UProgrammer) SDK folder.

I opened eclipse and pointed the workspace to the UProgrammer folder and it loaded the files as if I hadn’t changed anything. Then I made edited the comment block at the top of the file to indicate I had moved to NONOS SDK V1.5.4.  I saved the file and then checked the file in the new directory structure for the changes. It has the change I had just made.  To make sure there wasn’t something weird going on, I also checked the file in the old directory structure. It was unchanged.  I had planned on dealing with more problems just in case they happened.

I compiled the code to see if anything broke moving to the new SDK.  Things definitely broke. First the files all compiled but linking failed.  The first error message was:

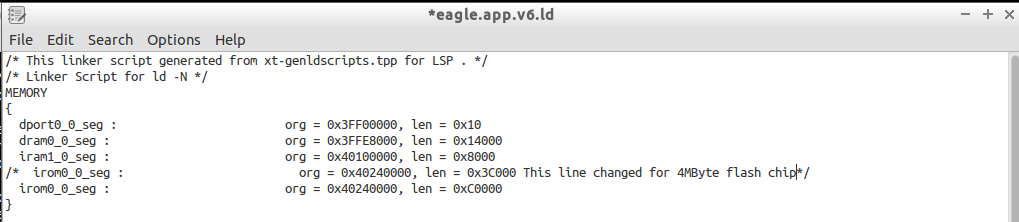
section `.irom0.text' will not fit in region `irom0_0_seg'

This reminded me that I modified the linker file eagle.app.v6.ld to allow for more room for the code space in a 4MByte flash chip.  I made the modification to the new file and saved it.

Modified linker file

I tried compiling again.  Again it failed to link but I was no longer getting the memory failure. This time the first error message was:

 undefined reference to `uart0_sendStr'

I didn’t have the most recent programming reference, so I went back to bbs.espressif.com to download it.  I got the 2C-ESP8266_SDK_API Guide_EN_1.5.4.pdf.  It turns out uart0_sendStr() isn’t in the documentation.  So I looked in my code to find it.  I found the prototype for it in uart.h. but it doesn’t appear anywhere else. This makes me wonder how I was compiling last week.  I did find it in uart.c in the drivers folder.  At one time that file was part of the project. I am guessing the object file was still getting linked in to the project.  The compiled object files are in hidden folders and didn’t get copied by default.  (It’s a good thing.  The versions of code on Github would not have worked. Now they will get fixed.)  I copied The code for uart0_sendStr() into simple_serial.c and recompiled expecting it to fail because uart0_sentStr() calls something else in uart.c.

Again I looked at the first error from the linker which was:

../lib/libat.a(at_ipCmd.o): In function `at_set_rx_buf_state':
(.irom0.text+0x10ac): undefined reference to `espconn_secure_sent'

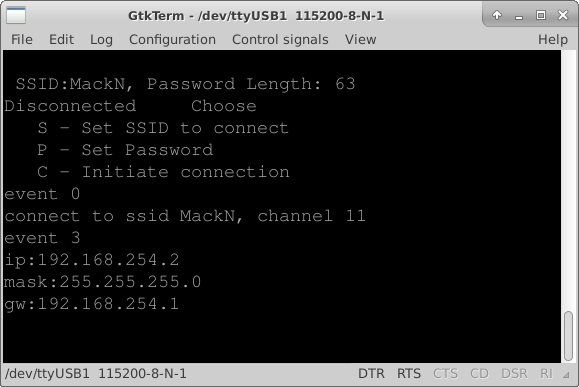
I am not using any secure features or any AT functions, so I decided to look at the make files. I used a Linux tool called meld to compare files.  There were very small differences.  Looking at my makefile, I noticed four lines that effectively added the -lat linker option.  I commented out those 4 lines and recompiled.  Now the linker only has 4 errors remaining, all of which can be fixed by copying code from the uart.c file.  After copying each function I needed from uart.c, I finally got a successful compile of the code.  I then uploaded it to the PCB to see if it still runs.  It ran the wrong code.  I now get a message in the serial terminal “dmode : softAP (XXX) indicating it is booting up as an access point.

I was able to connect to the device and dhcp worked, but an attemp to connect by http was refused.  Since the messages are system messages I decided to try a UART Swap. No change in the behavior.  I need to do a sanity check, this is a new API so back to doing a Hello World test. I finally got confirmation that my code is what is being uploaded to the module.  I placed the following function call:

system_set_os_print(0); // Turn off System Messages

into the code. I am no longer getting any output in the terminal.  I wasn’t getting any error from compiling but it turns out the function uart_tx_one_char() needed to be copied from the uart.c to simple_serial.c I chose not to have uart.c to reduce code size, there is a lot of code in uart.c that I will never use.

I cleaned up some of the things I tested recompiled and posted a new copy to Github. Do you have any tips for migrating between environments? I’d love to hear about them.

Code Cleanup and Boost Circuit testing (Firmware V00E)

This week I was reading through the SDK documentation, and realized a better way of handling serial events.  I was setting a flag and using a software timer to handle those events once a second. I also found that there is a webserver example in the IOT example.  I think this server is much simpler than ESP Ginx.  I have decided to try to use this example to move forward in the design

I decided to set up an OS task that I can post to that will do things like display the serial menu.  I am already using a task for serial handling.  (I grabbed it from an example and modified it for my uses).

I started by changing the UART task to a more generic task. I changed uart_recvTask to taskHandler. Then I just call an os_event_post with the action I want taken.  This allows the system to decide when to start the action. Displaying the menu and other tasks will generally happen faster this way.

As soon as I tried to do anything with GPIO16, I got lots of reboots.  It seems that the problems I was having with the Voltage boost circuit may have actually been GPIO16 problems. I have moved the control pin from GPIO16 to GPIO13 for enabling the voltage boost circuit.  With GPIO13 connected to the base of Q4 to enable/disable the boost circuit, the firmware booted and worked reliably.  After that I changed the filter resistor back to 10 Ohms as I had originally specified. And… It didn’t boot.

I replaced the 10 Ohm resistor with a 100 Ohm Resistor.  Still wouldn’t boot. I found that if I could get Q4 turned off, then the system would boot and run reliably.  As soon as I turned Q4 back on, the system would reboot and hang. So I tried adding a 100 μF between +BATT and GND to try to filter any electrical noise. It didn’t work.

I connected a bench power supply set at 3.3V to the boost circuit input, and I got it to partially work. I got 8 volts out of it for a few seconds.  I reinserted the GPIO16 initialization functions and no problems when no power is connected to the boost circuit.

I added some code that allows me to increment or decrement the prescaler using + and – keys respectively. When I hit the – key when the prescaler was at 0 to get to 255, it would reboot. When I hit the + key to go from 99 to 100 it would reboot.  So for now the prescaler is limited to the range of 0 to 99.

I am encouraged by getting the voltage on VPP higher than any supply voltage on the board. It appears that I need to create a separate ground plane just for the boost circuit.  If I couple it to the main ground with a low value inductor, I might be able to eliminate the problems it has caused.  I have uploaded the new version of the code. It still has very little commenting, however, I think it is cleaner and easier to read.

Functional testing for layout V00B

For testing purposes, I chose to put the code that I can control over a serial terminal into the ESP-12E. I had to make a few modifications for the new design.  The version for the last design/layout is archived on GitHub, I can easily go back to it if I find a need.

On the new design, several pins are different than before.  I changed the sigma delta output from GPIO2 to GPIO4 so it can drive the voltage boost circuit. I set GPIO16 to output low to turn on the voltage boost circuit, and I set GPIO2 to output low so that the boosted voltage would be on the programming header.

I had to make adjustments to the build environment to build esp-ginx.  Apparently I managed to break the build environment for the SDK in the process.  For esp-ginx I had updated to the newest version of the compiler toolchain.  This removed some symbolic links, so I couldn’t compile at all.  I fixed the symbolic links, and I am able to compile now, however it compiles without any errors but doesn’t make a binary file. Turns out I was in the wrong folder to link properly. Next the calls to GPIO16 causing a failure to compile. I needed to bring in the files gpio16.h and gpio16.c into the project.  Then the project failed to link with the errors “undefined reference to `gpio16_output_conf'” and “undefined reference to `gpio16_output_set'”.  This turned out to be where I placed the file gpio16.c, once I put it in the user folder, that error went away. Then I got a new Error “`.irom0.text’ will not fit in region `irom0_0_seg'” which means I ran out of code space.

While I was looking at the makefiles I noticed a section for configuring the memory in the sdk base folder. SPI SIZE MAP = 4 or 6  both match the ESP-12E. Setting it to 4 and then 6 didn’t fix the problem. Setting BOOT = new and APP to 1 got it to compile and link without errors.

I installed the new code and I get the menu up on my terminal window.

The sigma Delta doesn’t seem to be outputting anything on any pin. This means more testing.


First web page

I have the web server up and running which is great.

While reviewing my design, I found a few mistakes in the layout.  These mistakes are easily fixed with either a jumper wire or solder bridge, so I can keep on testing when the new PCBs arrive.

The web server isn’t working as easily as I had hoped.  I made a copy of the cats web page in the project, added my banner photo from this site and added html links in each page to point to the new page. With my picture added, It wouldn’t compile.  I am sure there is enough room in ROM, so I just need to figure out some settings. I removed the picture from the project and it compiles. I added an entry in my hosts file to point to smart.relay.com. When I go to smart.relay.com on my network it seems to work most of the time.  Speed and reliability will need to be worked on.

My new page unfortunately comes up blank. If I add .html to the end of the url my page loads correctly.  I went through the pages and added the .html ending to each link.  I don’t understand why this is happening this way.

I opened and modified the eagle.app.v6.ld  I changed the irom_0_seg  line. I changed the len value from 0x51000 to 0x80000.  This allowed me to add the banner photo into the project.  I don’t know if this can cause problems.  Assuming the value was at 0x51000 for a reason gives me reason to be concerned about it.  It’s possible that I have allowed data to overlap which could cause major problems. I need to learn how the .ld linker files work.

FirstWebpage

Simple Serial Firmware V00B

This week was focused on software.

I did a little research on my problem with the serial upload tool failing.  I found that I could update to a newer kernal that had been backported into the Ubuntu repository.  This kernel had the serial issues fixed.  So my vertual machine Lubuntu kernel is now version 3.19.0-30-generic.  Also, I wanted to try Windows 10 before installing the update on my wife’s computer.  I downloaded a copy from Microsoft and installed without a license key.  This is how you do a trial install.  You can go back and install a license key later.  With the new kernel and the new version of VirtualBox, programming the Esp-12E became very easy.

I have been using esptool.py on my circuit with no problems.  With the NodeMCU board that has the CH340G USB to serial chip still doesn’t work without modifying esptool.py. This is making me rethink changing to the CH340G chip because I just want it to work for someone that is developing new code.

I added a menu structure to the file simple_serial.c.  I copied some code out of uart.c that echos back what was sent.  I got that working pretty quickly.  Then I started reacting to the characters being received. I simplified the receive routine and passed the received character to the user interface function that I named simple_config_ui.  The user interface is implemented as a simple state machine that changes state based on the received character. I will use this menu structure to start testing the hardware such as writing and reading from the ram, toggling individual outputs, reading inputs, and setting the high voltage output level.

Remember the software as it currently stands is on GitHub.com.  Just click the firmware on GitHub link at the top or the right side bar on this page.  The software is functional and allows the user to connect to a WiFi access point by setting the SSID and Password through a serial port terminal.

TermnalConnected